Adjustment Programs Pack for EPSON Printers
Content: EPSON Adjustment Programs Reset-Pack.zip (1.91 KB)
Uploaded: 05.02.2024
Positive responses: 0
Negative responses: 0
Sold: 5
Refunds: 0
$3.05
Resetting the absorbent Adjustment Programs Pack for EPSON printers: L111 L210 L211 L 301 L303 L 351 L353 L 358 L551 L558 L1300 L130 L220 L310 L313 L 360 L363 L365 L1800 L455 L565 L605 L655 L800 L801 L805 Photo Stylus R370 Photo Stylus L830 L850 ME620F R390 Stylus Photo SP1430W WF7018 WF 7511 WF7521 Stylus CX9300F DS 360 DS 40 DS 560 ES 300W
Instructions for resetting the "pampers" using the Adjustment Program Reset Epson L series reset the pampers, ink counter
1.Launch the program by double-clicking on the Adjprog.exe file
2.If a window pops up when you open it:
3.That you need to open the program without unpacking it from the archive, or open the archive (rar) using a browser, it will offer to save the file, save and open it through the browser menu to Adjprog.exe. Or you can also open it through a virtual machine. Usually the problem occurs on Windows 7.
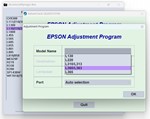
4.After opening in the appeared window of the program, press the Select button
5. In the Model Name field, select your printer model, in our case it is Epson L222.
6. Also, be sure to select the port to which your printer is connected (for example Auto selection). Click OK and return to the previous window.
7.Go into the service mode by pressing the PARTICULAR ADJUSTMENT MODE button
8.Find the Waste ink pad counter item and double-click on it
9. Press the Check button to see which counter is how overflowed, and which counter needs to be reset
10.In our case, the Main pad counter is overflowed, to reset it, put a tick next to it and press the Initialize button, we will reset both counters. Please pay to the following point: if there are unprinted jobs left in the print queue, the program may freeze, so do not forget to clear the print queue, in some cases, you should restart your computer
11.In the next window, a notification will appear "After clicking on the" OK "button, the counters will be reset", so press the "OK" button
12.Next, a notification about the need to turn off the printer using the On / Off button will appear. so we turn off the printer and turn it on again:
13.After turning on your printer, the error “Maintenance required. Contact the service center. " does not appear, the "Drop" and "Paper" indicators stop flashing, and you can continue your work, all this provided that you strictly followed the recommendations in this entry. Enjoy your typing!
No feedback yet


